Tuesday, December 13, 2016

Cool Colors for Winter

A trio of blue and green hues make for a fun and funky cool winter color combo.  It's brought to you by our happy Hand Stamped Sentiments blog.  Check out how the rest of the Design Team have worked this color challenge by jumping over to our website.  

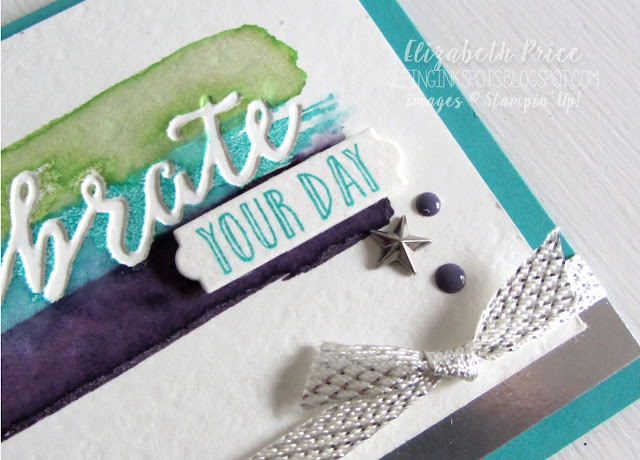
I thought it would be fun to use a few new goodies I received the other day.  On the top of wish list of new goodies was the Celebrations Duo TIEF Set and the coordinating Happy Celebrations Stamp Set.  When these two products were demoed at Onstage I was TOTALLY wowed by them.
First I embossed the "celebrate" and then I stamped over the debossed word with one of the images from the Happy Celebrations Stamp Set.  Right after stamping I painted the images with plain water to blend it out a bit and make it appear like I had done some watercoloring.
The extra embellishments include Metallic Shapes and 3/8" Metallic Ribbon.  It's new ribbon that will be offered during Sale-a-Bration.


Sunday, December 11, 2016

O' Succulent Tree

Hello stamp friends.  It's that time again when get together for a Monday Montage Hop.  For this hop I have decided to share a tree of succulents, rhinestones, and pearls.  I stamped a variety of of succulents from the Oh So Succulent stamp set and watercolored them with pale inks and an Aqua Painter.  Once they were dry I hand cut them out and futzed around until I decided to arrange them into a Christmas tree shape.  I think it makes a sweet Springtime wedding card with a nod to the Holiday season.
Dani
Julie


Friday, December 9, 2016

TGIF #85 Sketch Gone Wrong?

I have said this before that "when I play along with sketch challenges I do them from memory."  I study and get a good idea of the layout and then go to my stampin' space and get to creating.  So, once I finished my card for this week's TGIF #85 challenge and was uploading my photo I noticed I botched up the sketch.  I did make a take on the portrait layout, but I rotated it to a landscape orientation.
All season I have been using up my Warmth and Cheer DSP.  I still have some left, but I was in need of a change, something different that would still be cool and perfect for the holiday, yet not green and red plaids.  Check out how fun the A Little Foxy DSP works up in a Christmas card; it's fresh and light and has fit the bill for me.
What do you think?

Product List

Sunday, December 4, 2016

It's a Creation Station Wrap Up!


Oh don't get me wrong, we are not wrapping up the Creation Station Blog Hops.  As a Design Team we're wrapping up gifts for the season and sharing our pretty packages with you.
 In the Holiday Catalog you can find White Gift Boxes that are food safe and come with acetate sleeves that give a great glimmering shine and finish to each box.
 For this box the star of the show is the adorable poofy bow.  It's quite simple to make.  It's three circles that are folded and clipped and then fastened together.  Later in the week I will have photo tutorial to show you exactly how to make them.

I used the Lots of Labels Framelits to cut the tag for the box which I stamped with the Peaceful Pines set.  I actually love all the glimmer paper.  In small bits I think it works and since it's the Holidays a bit more sparkle is totally okay ;0) 
 A trio of banner tags are perfect for decorating the Petite Cafe Bags.  I cut 2" wide strips of Warmth and Cheer DSP and Very Vanilla card stock which I notched out with the Triple Banner Punch.  For the gift tag I stamped the "happy heart" image from the Suite Seasons stamp set which I inked up with Garden Green and Cherry Cobbler Stampin' Write Markers.
 The Petite Cafe Bags in the Annual Catalog are super cool.  They have a coated lining that is perfect for cookies or goodies.  My favorite part of my decorated bag is the bow.  Want to make one?  They are super easy.  Just cut six to eight 3 1/2" to 4" pieces of ribbon in a variety of colors and styles and tie them together.  To give this bow a bit more visual scale I added a crumpled doily and a Cherry Cobbler oval.
Thanks a bunch for stopping by to check out a few packaging ideas.  For me shopping for gifts is fun, but wrapping them and making them all jazzed up and pretty is what I love best.  Your next stop along the hop with with Denita.  She has some seriously awesome stampin' skills--enjoy!
Kimberly

Click directly on Denita's name below for the link to work. 
For some reason I cannot get the button to work.  I have tried five times, deleting and starting over, but it just won't work.  So, click on her name not on the "next" button and you will get there!

Denita

Tuesday, November 29, 2016

Tiny Table Tags

 I mentioned in my last Monday Montage Blog Hop post that I received a generous tip from a client for designing and setting up her family's Thanksgiving table.  I said I would post pictures from the set up and so...
here they are.
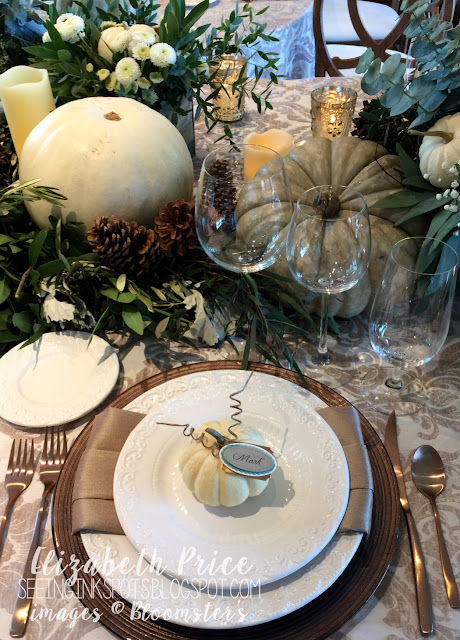
The last thing I set were the guest's pumpkin placecards.  The tiny tags were made with Stampin' Up! tools and card stocks.  For the first name tag layer I used the smallest oval, which is Crumb Cake, from the Stitched Shapes Framelits.  The next layers are Mint Macaron and Very Vanilla cut with the Ovals Layering Framelits.  And then, the last layer is Copper Foil cut from the Tags and Labels Framelits.

What would I do without my fabulous stash of tools and supplies from Stampin' Up!?
Rentals for the table came from both La Tavola Linens and Hensley Event Resources.  The linens are called Neiman in the Ecru color and are king drape size.  I needed three to fit the client's "L" shaped table to seat 21 guests.  The chairs and place settings came from Hensley and were perfect for the look I wanted.  I love their Antique Wood Infinity Chairs with Ivory Velour Cushions.  This is the second event in a few months that I have used these--they're beautiful!  
 Of course all the flowers, garland, pumpkins, candle work, and mercury glass vases came from Bloomster's.  We included eucalyptus, olive, and dusty miller leaves along with eucalyptus pods and berries for the garland runner, which we laid out first.  Then we tucked in mixed grey, green, and white leafy styled bouquets created in grey toned wooden boxes into the garland.  Lumina and Jarahdell pumpkins along with pinecones, and miniature white pumpkins finished up the fresh floral decor for the table.

I hope you have enjoyed a look into what I do.

Sunday, November 27, 2016

Monday Montage #83

It's been a tasty holiday weekend and what better way to top it off than a Monday Montage Blog Hop.  I had a fun opportunity last Wednesday to design and set up a GORGEOUS kings table to seat 21 guests for a client of ours.  (I'll show you pics later)  As I left the set up I was handed an awesome tip which made me feel so appreciated.  

This coming giving season we find ourselves tipping and thanking those who serve us.  What cuter way to give a tip than in a sparkling card.  It's a perfect idea.  A pocket for the tip and a space to write a note of thanks.
to Dara
to Julie


Friday, November 25, 2016

TGIF #83 Spotlighting Cathy Caines

Now this is a fun one!  The challenge this week at TGIF is to be inspired by the most unique and stylish Cathy Caines.  She is a forward thinking paper crafter who has a style all her own that draws me in and inspires me.  When I think of Cathy I think watercolor, blue tones, grouped layers placed with skilled panache, and Project Life!  Hop over to Cathy's blog In the Cat Cave and check it all out.
For this watercolored background I start by scribbling a bunch of blue tones all over a piece of shimmer White card stock.  Sribbling, you ask?  Yes, with the new Watercolor Pencils which are in the up and coming Occasions Catalog.  I was lucky to receive a pack a the end of Onstage in Phoenix.  So, after the sribbling I took an Aqua Painter to blend the colors and then sprinkled a bit of sea salt on the wet paper to create more visual texture.